
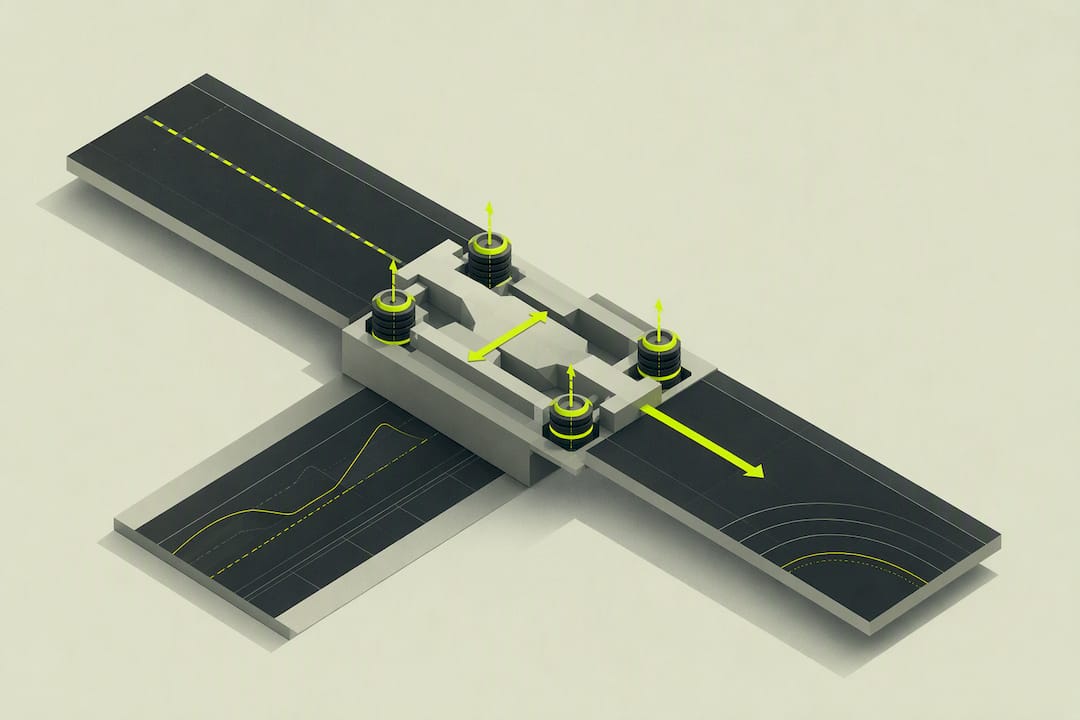
Weight transfer, more precisely called load transfer, is the change in load at each tire caused by acceleration, braking or cornering. Its size scales with mass, acceleration and center-of-gravity height, and it shrinks as wheelbase or track width grows. For a sim racer, the practical result is simple: the tire carrying more load has more grip available, and the one losing load has less, which is why braking, throttle and steering inputs all change how a car rotates.
TL;DR:
- Load transfer scales with mass, acceleration, and center-of-gravity height, and decreases as wheelbase or track width increases, affecting grip distribution during maneuvers.
- Equations for load transfer assume a rigid body with fixed center of gravity, but real cars' suspension and aerodynamics modify actual load shifts at the contact patches.
- Lowering the car’s center of gravity or increasing wheelbase can reduce transfer effects, but anti-roll bar adjustments mainly shift load distribution without changing total transfer.
- During complex maneuvers like trail braking, the front outside tire carries the most combined load, influencing grip and tire wear.
- Using load transfer formulas and iterative testing helps fine-tune setup and technique, optimizing grip during braking, cornering, and acceleration phases.
Table of Contents
- What load transfer actually is versus weight motion
- Calculating longitudinal weight transfer step by step
- Lateral transfer and what happens when maneuvers combine
- Tuning geometry and setup to control how transfer behaves
- Applying weight transfer analysis to get faster in F1 26
- Estimating inputs when you don't have a spec sheet
- Why weight transfer numbers are a diagnostic tool, not a rulebook
- Turning these numbers into faster laps with Virew
- Where these formulas and numbers come from
- Sources
- FAQ
What load transfer actually is versus weight motion
Load transfer and weight motion sound like the same thing but they are not. The car's mass does not physically move to the front or rear axle when you brake. What changes is how much of that fixed mass presses down on each tire contact patch, because braking, accelerating or cornering forces create a moment around the car's center of gravity. That moment redistributes vertical load between axles or between left and right sides, even though the center of mass itself barely shifts relative to the chassis.
This distinction matters because it tells you what you can and cannot change. You cannot eliminate load transfer, since it is a direct consequence of Newton's second law acting through a raised center of gravity. You can only change its magnitude or how it gets distributed across the four contact patches.
The standard longitudinal equation is:
ΔW = (a · h · m) / b

Here, ΔW is the load transferred between front and rear axles in newtons, a is longitudinal acceleration in meters per second squared, h is center-of-gravity height in meters, m is vehicle mass in kilograms, and b is wheelbase in meters. Braking moves load onto the front axle and off the rear. Accelerating does the reverse.
The lateral equivalent swaps wheelbase for track width:
ΔW_lateral = (a_y · h · m) / t
where a_y is lateral acceleration and t is track width, the distance between the left and right contact patches on an axle. Cornering shifts load onto the outside tires and off the inside ones.
Both equations assume a rigid body with a fixed center of gravity, no suspension travel and no aerodynamic load. Real cars have compliant suspension, roll centers that move, and downforce that grows with speed, all of which modify how the raw transferred force actually reaches the tires. The equations still matter because they define the baseline magnitude before any of those secondary effects are layered on.
Calculating longitudinal weight transfer step by step
Working through longitudinal transfer by hand takes four steps: confirm your units, plug in the known values, solve for the transferred force, then convert that force into an axle load change and a percentage.
- Convert acceleration to meters per second squared and mass to kilograms so the result comes out in newtons.
- Multiply acceleration by center-of-gravity height, then by mass, then divide by wheelbase to get ΔW.
- Add ΔW to the resting load on the axle gaining load, and subtract it from the axle losing load.
- Divide each new axle load by the total vehicle weight to express the shift as a percentage.
A calculator implementation of this formula uses a car with a mass of 1,500 kilograms, a center-of-gravity height of 0.55 meters, a wheelbase of 2.70 meters and a braking deceleration of 3.0 meters per second squared. Plugging those into ΔW = (a · h · m) / b gives roughly 916.7 newtons shifted from the rear axle to the front.
To put that in context, assume the car's resting weight split is even at 50/50. Total weight is 1,500 kilograms times 9.81 meters per second squared, or about 14,715 newtons, split into 7,357.5 newtons per axle at rest. Under that 3.0 meters per second squared braking event, the front axle gains the transferred 916.7 newtons to reach about 8,274 newtons, while the rear axle drops to about 6,441 newtons. That is roughly a 6.2 percentage point swing in axle load share, from 50/50 to about 56/44.
| Input | Value |
|---|---|
| Mass | 1,500 kg |
| CG height | 0.55 m |
| Wheelbase | 2.70 m |
| Deceleration | 3.0 m/s² |
| Load transferred | ~916.7 N |
| Resulting axle split | ~56/44 |
Converting the axle figure into corner loads requires one more assumption: whether left and right sides share the change evenly. On a straight-line braking event with no steering input, they generally do, so each front tire in this example gains about 458 newtons and each rear tire loses about the same. Once steering enters the picture, lateral transfer stacks on top of this and the four corners stop sharing the load evenly.
Lateral transfer and what happens when maneuvers combine
Lateral load transfer follows the same logic as longitudinal, but it moves load from the inside tires to the outside ones during cornering, scaled by track width instead of wheelbase. A narrower track width means more lateral transfer for the same cornering force, which is one reason narrow-track cars tend to feel more sensitive to steering input near the limit.
The real complexity comes when braking or accelerating happens at the same time as cornering, which is most corners on a real lap. Trail braking into a corner combines longitudinal transfer (loading the front) with lateral transfer (loading the outside), so the outside front tire ends up carrying the largest share of the car's total load. That tire also has the most grip available, which is exactly why trail braking can help rotate a car into an apex if the timing is right.
- The front outside tire typically carries the highest combined load during trail braking, giving it the most grip but also the most heat and wear.
- The rear inside tire carries the least load in that same phase, which is why it is the first to lose contact patch pressure and the first to spin under too much throttle.
- On corner exit, accelerating shifts load rearward while the car is still turning, so the rear outside tire becomes the highest-loaded corner instead.
Roll center height and suspension compliance change how quickly and how smoothly this transfer reaches the tires, without changing the total amount of load being transferred. A higher roll center tends to resist body roll more directly but can introduce more jacking effect, while softer bushings and compliant suspension delay how fast load actually arrives at the contact patch. None of that changes the physics equation itself, only the timing and smoothness of the transfer the equation predicts.
Tuning geometry and setup to control how transfer behaves
The load transfer equations show exactly which variables matter, and setup work is largely about pushing on the ones you can actually change. Center-of-gravity height and vehicle mass are mostly fixed by the car's homologation, but wheelbase, track width, spring rates and anti-roll bar stiffness are all setup-adjustable in most sim racing contexts.
- Lowering center-of-gravity height reduces both longitudinal and lateral transfer for the same acceleration, which is why ride height changes affect handling balance even without touching springs.
- A longer wheelbase reduces longitudinal transfer for a given braking or acceleration force, trading some agility for stability under heavy braking.
- A wider track width reduces lateral transfer for a given cornering force, generally making the car feel more planted through fast corners.
- Stiffer anti-roll bars change how lateral transfer is distributed between the front and rear axles without changing the total lateral transfer the car experiences.
- A stiffer front bar shifts more of the outside load onto the front axle relative to the rear, which tends to reduce front grip margin and push the balance toward understeer.
That anti-roll bar point is worth sitting with, because it is the most commonly misunderstood part of setup tuning. Total lateral load transfer is set by mass, CG height, lateral acceleration and track width. Springs and anti-roll bars cannot change that total. What they change is which axle absorbs more of that transfer relative to the other, which is how you shift the car's balance between understeer and oversteer without touching outright grip.
Pro Tip: Change one setup variable per test session, run the same corner sequence at least three times, and judge the result by how the car rotates and where it loses time, not by how the ride height slider felt in the garage.
Applying weight transfer analysis to get faster in F1 26
Once you understand how load moves, the next step is using that knowledge on track. Weight transfer analysis is not something you need a telemetry overlay to feel: braking points, throttle timing and steering inputs are the levers, and lap time is the feedback.
- Brake in a straight line first, then release brake pressure smoothly as you turn in, so the front tires keep the load trail braking gives them without overloading the front and washing out the nose.
- Time your lift-to-turn phase so the car has already started settling its weight forward before you ask for steering angle, especially into slower corners like the Turn 1 hairpin at a tight street circuit.
- Roll onto the throttle progressively on exit rather than stabbing it, so rear load transfer builds gradually and the rear tires keep grip through the transition from cornering to acceleration.
Setup choices interact with this technique directly. A car with a stiffer front anti-roll bar setting will resist load transfer to the front on entry, which can help stability under trail braking but costs you some of the front grip that a driver relies on to rotate the car into slow corners. Wing balance works alongside this at higher speeds: more rear wing supports the rear axle's grip on exit, letting you get back to throttle earlier, while less rear wing trades that exit stability for a straight-line speed advantage.
Because Virew does not analyze telemetry, the most reliable way to test any of this is a controlled in-sim experiment. Set a baseline of three to five clean laps with your current setup and technique, change exactly one variable such as trail braking duration or anti-roll bar stiffness, then run another three to five laps and compare sector or corner times against the baseline. Averaging several laps instead of judging off a single fast one filters out the lap-to-lap noise that comes from small driving variation.

Pro Tip: Run your baseline and your test laps back to back in the same session so track temperature and tire wear stay comparable between the two sets.
This is where structured coaching becomes useful. Uploading a lap for AI analysis turns a vague feeling of "the rear felt loose on exit" into a specific coaching note tied to a corner, and Virew converts that into a focused daily mission so the next practice session has a clear target instead of a general goal to drive faster.
Estimating inputs when you don't have a spec sheet
The equations only work as well as the numbers you feed them, and center-of-gravity height is the hardest input to get right. Published manufacturer specs, when available, are the most reliable starting point, since measuring CG height directly requires lifting one end of a vehicle on a scale, a method well outside what most sim racers or even many engineers can do casually.
For a first-pass estimate, treating CG height as a fixed fraction of a car's overall height is common in introductory vehicle dynamics material, though the resulting number carries meaningful uncertainty and should be treated as a starting point rather than a precise value.
- Simple calculators using ΔW = (a · h · m) / b are appropriate for first-pass estimates and for understanding directional trends, not for final setup decisions.
- Aerodynamic downforce should be added into the model once cornering or braking speeds get high enough that downforce meaningfully changes total vertical load on the tires.
- Full suspension compliance and roll-center migration matter most when comparing two very different setups, less so when making small incremental changes.
Why weight transfer numbers are a diagnostic tool, not a rulebook
The equations are useful because they tell you the direction and rough size of an effect before you touch a setup slider or change a braking habit. What they cannot tell you is how a specific car, corner or driver will respond, which is why treating a calculated number as a target rather than a signal is a mistake.
The bigger gain for most drivers is sequencing: getting the order and timing of brake release, steering input and throttle application right so load arrives at the tire that needs it, when it needs it. A driver who nails that sequencing on a car with an average setup will usually beat a driver with a perfectly calculated setup and sloppy inputs. Test one change at a time, judge it by lap time and corner feel, and let the equations explain why something worked rather than dictate what to try next.
— Virew
Turning these numbers into faster laps with Virew
Reading about load transfer is one thing, seeing it show up in your own driving is another. Virew is built for exactly that gap: upload a lap from F1 26 and get coaching feedback on where you are losing time, whether that is braking too early into a corner that rewards trail braking or getting back to throttle too aggressively on exit and unsettling the rear.
The workflow is simple. Set a baseline lap, make one change to your technique or setup, upload the new lap, and let the coaching report tell you whether the change actually helped or just felt different. Virew adapts its feedback to session type and car, so advice for a Time Trial lap looks different from advice for managing tires across a race stint. Start with a free analysis through Virew's lap analysis guide and see exactly where your next lap time is hiding.
Where these formulas and numbers come from
The longitudinal and lateral transfer equations and their derivation come from the Wikipedia entry on weight transfer. The worked numeric example uses the Calculator Academy weight transfer calculator. Setup and anti-roll bar guidance draws on Applied Racing Dynamics documentation, and driver technique notes come from Allen Berg Racing Schools.
Sources
- Weight transfer - Wikipedia
- Weight Transfer Calculator - Calculator Academy
- Load Transfer and setup notes - Applied Racing Dynamics docs
- The Physics Of Racing Part 1: Weight Transfer | ABRS
FAQ
How do I calculate weight transfer?
Use ΔW = (a · h · m) / b for longitudinal transfer or swap wheelbase for track width to get lateral transfer, where a is acceleration, h is center-of-gravity height and m is mass. A worked example using a 1,500 kilogram car with a 0.55 meter CG height, 2.70 meter wheelbase and 3.0 meters per second squared deceleration gives about 916.7 newtons shifted between axles.
What does weight transfer mean?
Weight transfer, more accurately called load transfer, describes how much load shifts between tires when a car brakes, accelerates or corners, without the vehicle's actual center of mass moving. Its magnitude depends on acceleration, center-of-gravity height, mass and either wheelbase or track width.
Is weight transfer to the front or rear?
Braking shifts load toward the front axle, while accelerating shifts it toward the rear, based on the direction of the longitudinal acceleration acting through the car's center of gravity. Cornering shifts load sideways toward the outside tires instead, and combined maneuvers like trail braking mix both effects on the same corner.
How important is weight transfer in golf?
Weight transfer in golf refers to how a player shifts body weight during the swing, which is a different concept from the vehicle load transfer covered in this article. Sports-science research on the golf swing notes that timing and magnitude of that weight shift both affect performance, which parallels how timing matters as much as magnitude in vehicle dynamics.